|
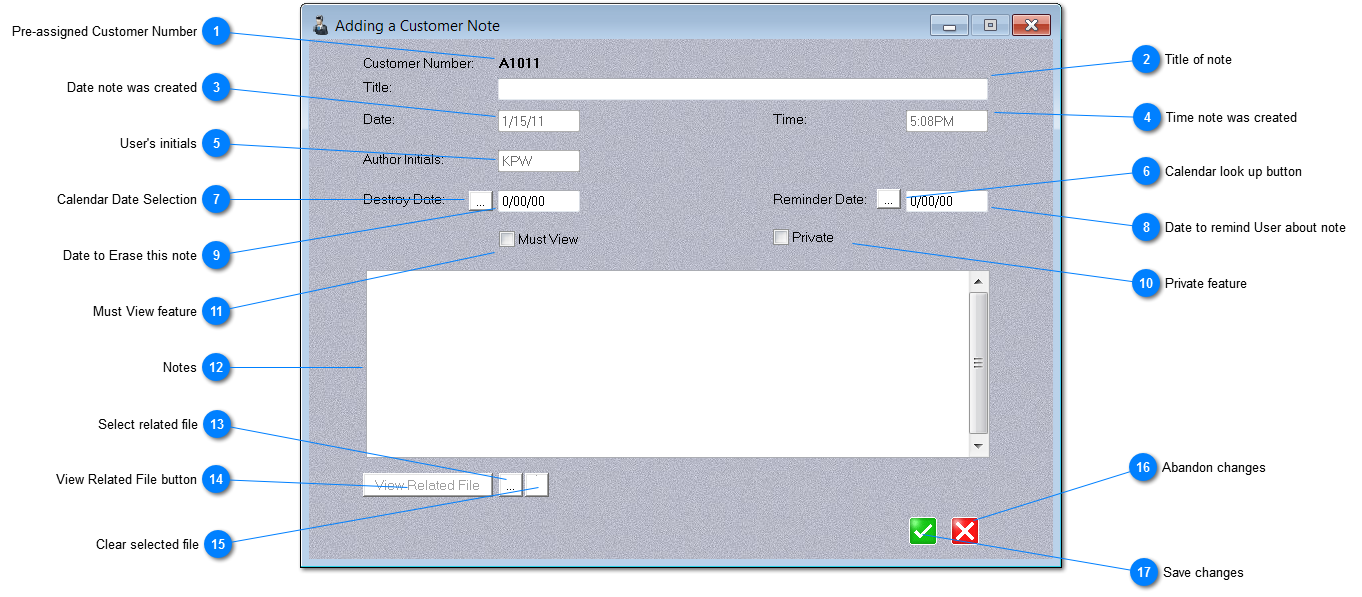
 Pre-assigned Customer Number
A unique number that ties the note to the related object. (a customer, in this case) This value is pre-assigned and cannot be changed by the user.
| |
 Title of note
Description of the note that will appear in the Notes listing. Up to 100 characters.
| |
 Date note was created
The date of the note is set automatically and cannot be changed by the user.
| |
 Time note was created
The time the note was created is automatically set by the program and cannot be modified by the user.
| |
 User's initials
The user's initials (as set in the User record) are automatically inserted into the note and cannot be changed by the user.
| |
 Calendar look up button
Opens a calendar that may be useful in selecting a reminder date.
| |
 Calendar Date Selection
This button displays a calendar that may be useful in selecting an appropriate date to remove this note from the database
| |
 Date to remind User about note
Setting a reminder date here will insert a task in Microsoft Outlook with the due date you show here. If Outlook is not installed, this field is ignored.
| |
 Date to Erase this note
Agenda Development programs automatically remove old notes once they have past the Destroy Date you set here. NOTE: The notes may not be removed exactly on the Destroy Date, but could be removed at any time past the date you set here.
| |
 Private feature
Check this box and the note will only be displayed to the User who created it. (Super Users may also be able to view this note so it is best not to write nasty notes about your boss here.)
| |
 Must View feature
Check this box and the note will be displayed anytime someone uses this object.
| |
 Notes
Up to 1,200 characters may be entered here to explain the purpose of the note.
| |
 Select related file
Browse files to select a related file. Files located in the installed folder or sub-folders will be viewable by all users of the program (unless the note is marked private). Files that are located in other folders are only visible from the originating computer. Example: a file located in your My Documents folder will only be accessible on your computer.
| |
 View Related File button
Once a related file is identified, pressing this button will load the appropriate program and display the related file. Any document that is recognized by your computer will automatically load the appropriate program. Examples: Word documents, Excel spreadsheets, PDF files, video files, sound recordings, etc.
| |
 Clear selected file
Press this button to clear the related file. NOTE: This does not erase the related file, it only removes the reference to the file in this note.
| |
 Abandon changes
Cancel the note without saving
| |
 Save changes
Press this button to save the note as you have written it.
|